How Do You Decode Marine Paint Adhesion Test Results for a Perfect Finish?
Paint failure leads to costly corrosion and delamination. Don’t let poor adhesion ruin your vessel. Understanding marine paint adhesion test results is your best defense for long-term protection.
Decoding marine paint adhesion test results means translating test data into actionable knowledge about your coating’s performance. It involves interpreting either a quantitative value (measured in PSI or MPa) from a Pull-Off Adhesion Test or a qualitative classification (from 5B to 0B) from a Cross-Hatch Test. A strong result confirms that the paint has formed a powerful bond with the substrate or underlying coat, ensuring long-term protection. Conversely, a poor result is a critical warning sign, often pointing to underlying issues such as inadequate surface preparation, contamination, or application errors that could lead to premature coating failure like blistering or delamination [8, 13]. Understanding not just the value but also the type of failure (e.g., adhesive vs. cohesive) is crucial for accurate diagnosis and effective remediation, ensuring the durability and integrity of the entire paint system.
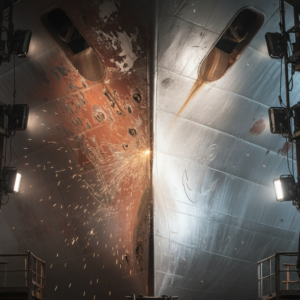
![[Image Placeholder]**Prompt:** A dramatic, high-contrast image showing a section of a ship's hull with severe paint delamination and blistering, with rust showing through. The other half of the hull is pristine, highlighting the contrast between failure and success.](https://jdmarinepaint.com/wp-content/uploads/2025/07/a-dramatic-high-contrast-image-showing-a-section-4.png "[Image Placeholder]**Prompt:** A dramatic, high-contrast image showing a section of a ship's hull with severe paint delamination and blistering, with rust showing through. The other half of the hull is pristine, highlighting the contrast between failure and success.")
Now that you grasp the importance of these results, let’s dive into what these tests actually are and why they are non-negotiable for any serious marine coating project.
What Are Marine Paint Adhesion Tests and Why Are They Essential?
You’ve invested significant time and money into a new paint job for your vessel, but how can you be certain it will provide lasting protection? [13] Without objective verification, you are essentially gambling with your asset’s integrity. A weak bond is an invisible threat lurking beneath a glossy surface, a ticking time bomb that can lead to catastrophic failure from corrosion and delamination, quickly turning your valuable investment into a costly liability. Marine paint adhesion tests are the professional standard for removing this uncertainty, providing objective proof of coating quality and ensuring your vessel is protected precisely as specified by the manufacturer.
A marine paint adhesion test is a procedure designed to measure how strongly a coating adheres to a substrate (like steel or fiberglass) or to the previous layer of paint (a property known as intercoat adhesion). The core purpose of this testing is to ensure the coating system will perform as expected and prevent premature failure. Strong adhesion is a fundamental characteristic of high-quality marine paints, from durable primers like our JDH815 Iron Oxide Red Epoxy Primer to tough, weather-resistant topcoats [2, 10]. Verifying this bond is a critical step in any quality assurance program for marine applications. It helps prevent costly issues such as delamination, blistering, and corrosion, validates work for warranty claims, and ultimately ensures the long-term protection and value of your maritime asset [6]. Simply put, if a paint doesn’t stick, it doesn’t protect.
What Are the Primary Methods for Testing Marine Paint Adhesion?
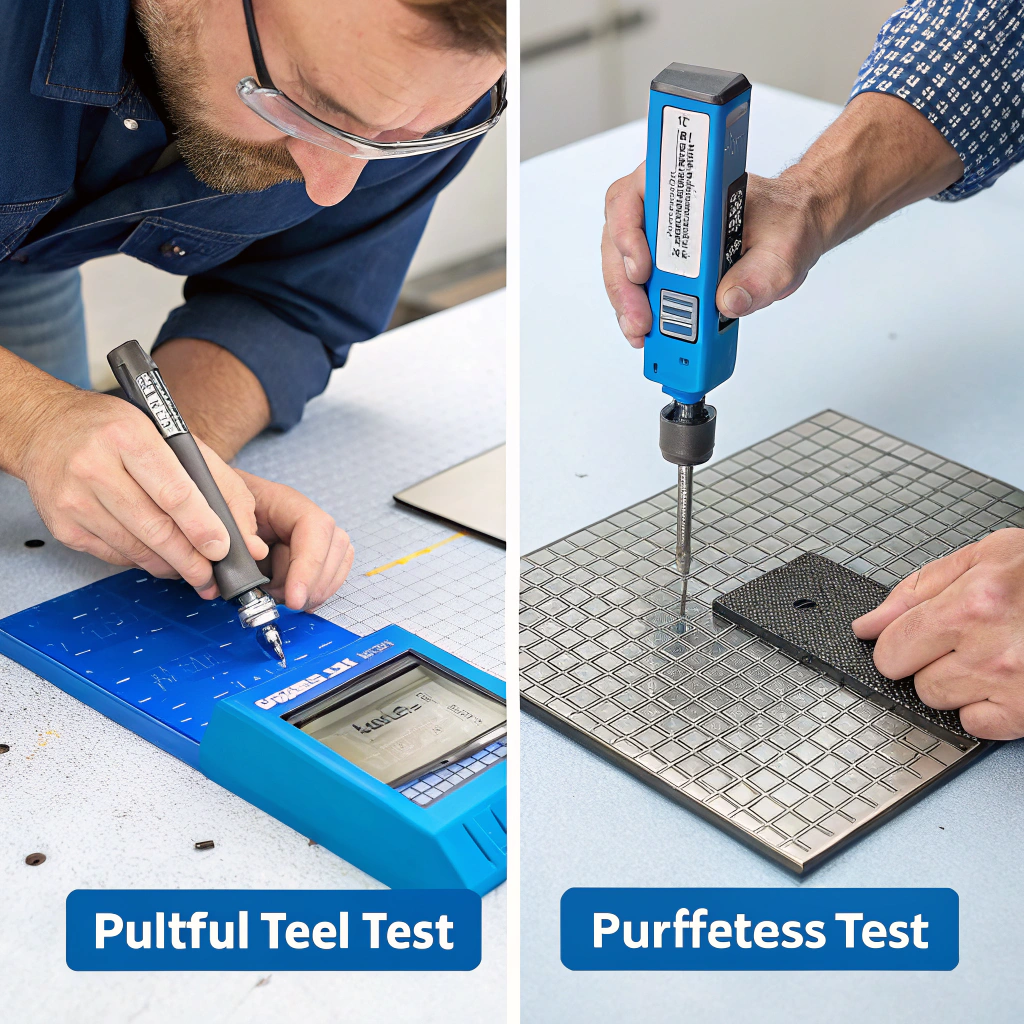
You know you need to test for paint adhesion, but the various methods—pull-off, cross-cut, scrape—can seem complex and intimidating for those new to the field. Which one is right for your project? Choosing the wrong test, or performing it incorrectly, can provide misleading information. This might give you a false sense of security, allowing underlying problems to fester unnoticed until they surface as visible and expensive failures. Let’s demystify the three primary testing methodologies. Understanding the purpose of each—from the highly quantitative pull-off test to the practical knife check—will empower you to select and perform the right assessment for your specific needs, ensuring reliable results every time.
The primary methods for testing marine paint adhesion are the Pull-Off Adhesion Test (ASTM D4541), the Cross-Hatch Test (ASTM D3359), and the simple Knife/Scrape Test. The best method depends on the project’s requirements: whether you need a precise, quantitative measurement of bond strength or a quick, qualitative field assessment. The pull-off test is the most accurate, providing a specific numerical value of the bond strength in PSI (pounds per square inch) or MPa (megapascals), making it ideal for verifying compliance with technical specifications and conducting in-depth coating failure analysis. In contrast, the cross-hatch test is faster and delivers a visual rating, making it perfect for routine quality control checks on flat surfaces. The knife test, while subjective, remains a valuable and practical field method for quick, on-the-spot assessments.
![]()
The Pull-Off Adhesion Test (ASTM D4541): A Quantitative Analysis
This is the most precise method for measuring adhesion. The process involves gluing a metal loading fixture, known as a "dolly" or "pull-stub," to the surface of the coating. Once the adhesive has cured, the coating is often scored around the dolly to isolate the test area. A portable adhesion tester, such as one of the modern pull-off adhesion testers from leading manufacturers, is then attached to the dolly. The instrument applies a perpendicular pulling force, steadily increasing the pressure until the dolly is pulled off the surface. The force required to detach the dolly is recorded, providing a quantitative measurement of the adhesive strength in PSI or MPa. This test is considered destructive but provides the most accurate and repeatable data, making it the preferred method for specification compliance and failure analysis.
The Cross-Hatch / Cross-Cut Test (ASTM D3359): A Qualitative Assessment
The cross-hatch test is a widely used qualitative method for assessing adhesion, especially in field applications. It involves using a special cutting tool with multiple blades to cut a lattice or grid pattern through the paint film down to the substrate. After the cuts are made, a specified pressure-sensitive tape is applied firmly over the grid and then rapidly pulled off at a sharp angle. The adhesion is evaluated by visually comparing the amount of paint lifted off by the tape to a classification chart. The result is rated on a scale from 5B (no paint removal, perfect adhesion) to 0B (severe flaking, very poor adhesion). You can find the complete methodology in the official ASTM D3359 standard.
The Simple Knife or Scrape Test: A Practical Field Assessment
This is the simplest and quickest method for a basic adhesion check. Using a sharp utility knife, an "X" is cut through the coating to the substrate. The inspector then attempts to lift the coating from the substrate at the intersection of the cut. The difficulty or ease with which the paint can be lifted provides a subjective assessment of its adhesion. If the coating chips or can only be removed in tiny slivers with significant effort, adhesion is generally considered good. If it peels away easily in ribbons or large flakes, adhesion is poor. While this method is highly subjective and not standardized, it’s a practical way to identify significant adhesion problems on the spot.
How Do You Correctly Interpret Marine Paint Adhesion Test Results?
You’ve completed an adhesion test, and now you have a result—a number in megapascals or a code like "4B." But what does this data actually mean for the long-term health of your paint job? Misinterpreting these results is a common and costly error. A "pass" might not be sufficient for the harsh conditions of a marine environment, and failing to understand the type of break (e.g., adhesive vs. cohesive failure) means you cannot accurately diagnose the root cause of a potential problem. We’ll guide you through analyzing these marine paint adhesion test results like a seasoned professional. You’ll learn what values to look for, how to decode the ASTM scale, and—most importantly—understand the critical story the failure mode tells you about your coating system’s integrity.
Correctly interpreting marine paint adhesion test results requires looking beyond a simple pass/fail value. For a pull-off test (ASTM D4541), the resulting pressure value (in PSI or MPa) must be compared against the specifications in the paint manufacturer’s Technical Data Sheet (TDS). For example, a high-performance primer may require a much higher pull-off strength than a cosmetic topcoat. Just as important is observing the failure mode. Adhesive failure (the paint separates cleanly from the substrate or a previous coat) typically points to surface preparation issues, while cohesive failure (the paint itself fractures and splits) often indicates a problem with the coating material or its application [8, 13]. For a cross-hatch test (ASTM D3359), you interpret the result using the 0B to 5B classification scale. A rating of 5B indicates a perfect bond, while anything below 4B is often a cause for concern that warrants further investigation.
Analyzing Pull-Off Test Results: More Than Just a Number
The final pull-off pressure value is only half the story. The location of the break is just as crucial for diagnostics. Always consult your paint’s Technical Data Sheet (TDS) for the required pull-off strength. Products like our high-performance epoxies are designed for superior bonding, and their TDS will specify the minimum values they are engineered to meet [2, 14].
| Failure Type | Description | Common Cause |
|---|---|---|
| Adhesive Failure | The coating detaches from the substrate or between two different paint layers (intercoat). | Poor surface preparation, surface contamination (oil, salt, dust), or exceeding the recoat window. [8, 13, 23] |
| Cohesive Failure | The fracture occurs within a single layer of paint, leaving the same coating on both the dolly and the substrate. | Incorrect mixing of two-part paints, trapped solvents, internal stresses, or the coating being applied too thickly. [1] |
| Glue Failure | The adhesive used to attach the dolly fails before the coating does. | The test is invalid for measuring the coating’s adhesion, but it proves the coating’s bond is stronger than the test adhesive’s strength. |
Decoding Cross-Hatch Test Results: The ASTM Classification Scale
The cross-hatch test provides a fast visual reference for adhesion quality. In a demanding marine environment, any result below a 4B should be investigated.
| ASTM Class | % Area Removed | Description |
|---|---|---|
| 5B | 0% | The edges of the cuts are completely smooth; no detachment of paint. |
| 4B | Less than 5% | Small flakes of the coating are detached at the intersections of the cuts. |
| 3B | 5% – 15% | Small flakes of paint are detached along the edges and at the intersections of the cuts. |
| 2B | 15% – 35% | The paint has flaked along the edges and on parts of the squares in large ribbons. |
| 1B | 35% – 65% | The paint has flaked in large ribbons along most of the cut edges. |
| 0B | Over 65% | Flaking and detachment is worse than Grade 1, with almost complete removal. |
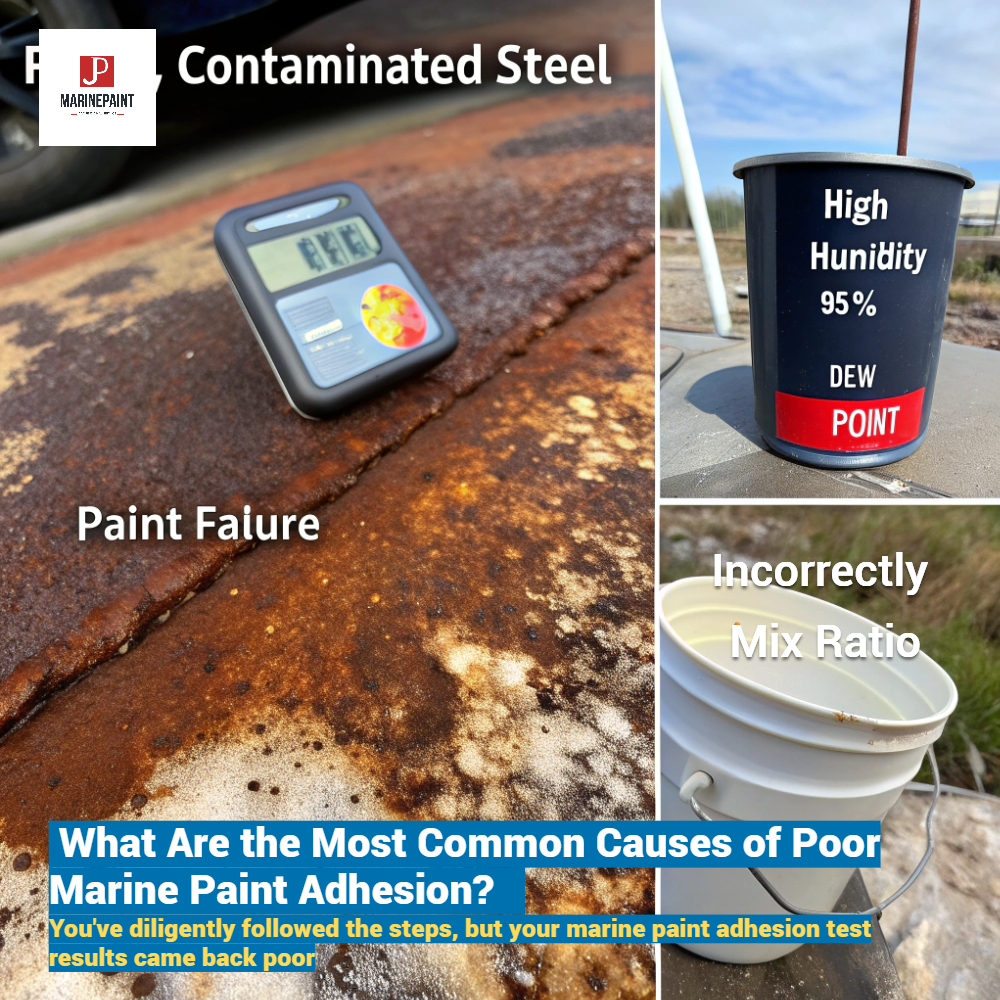
What Are the Most Common Causes of Poor Marine Paint Adhesion?
You’ve diligently followed the steps, but your marine paint adhesion test results came back poor. It’s a frustrating outcome that can leave you wondering what went wrong. Ignoring the root cause of this failure is like patching a leak without fixing the broken pipe. Simply repainting the surface without addressing the underlying issue will only condemn you to repeat the same costly failure in the future. Delamination, blistering, and runaway corrosion are all but inevitable if the fundamental problem isn’t solved. We’ll pinpoint the exact culprits. From invisible surface contaminants to environmental pitfalls, understanding these common factors is the key to preventing adhesion failure before it starts.
The most common and critical cause of poor marine paint adhesion is, overwhelmingly, inadequate surface preparation [13, 19]. A surface that is not perfectly clean, dry, and properly profiled with an anchor pattern cannot form a strong mechanical bond with the coating [29]. Contaminants like salt, oil, grease, moisture, and dust act as a release layer, physically preventing the paint from achieving a proper bond with the substrate [8, 23]. Environmental conditions also play a pivotal role; applying paint in high humidity or when the surface temperature is less than 3°C above the dew point can trap moisture beneath the film, leading to poor curing and blistering [1]. Finally, errors during the application itself, such as incorrect mixing of two-component products like our JDC53-31 Red Lead Alkyd Anti-Rust Paint [7, 30], over-thinning the paint, or exceeding the recoat window can compromise the chemical integrity and adhesive strength of the coating system [1, 26].
Inadequate Surface Preparation: The Number One Cause of Failure
No paint, no matter how advanced, can adhere properly to a dirty or unsound surface [13]. Surface preparation is the foundation of a successful paint job. This means completely removing all loose paint, rust, and oxidation scale [6, 25]. For steel substrates, the industry benchmark is often abrasive blasting to a specific cleanliness standard, such as Sa 2½, which creates a clean, profiled surface for the primer to grip onto [9, 29]. As leading paint manufacturers emphasize in their surface preparation guidelines, taking shortcuts here will always lead to failure.
Surface Contamination (Salt, Oil, Dust)
Contaminants are the invisible enemy of adhesion. Even a thin, unseen layer of oil or grease will prevent a coating from "wetting out" the surface, destroying any chance of a good bond [8, 23]. Salt is particularly damaging; being hygroscopic, it can pull moisture through the paint film via osmosis, leading directly to blistering and under-film corrosion. All surfaces must be thoroughly degreased and, ideally, pressure washed with fresh water to remove salt deposits before painting [8].
Environmental Conditions (Humidity, Temperature, Dew Point)
Marine paints are chemically engineered to cure under specific conditions. Applying them outside of the recommended temperature and humidity range is a recipe for disaster. A critical rule is that the substrate’s temperature must be at least 3°C (5°F) above the dew point [1]. If it’s not, invisible condensation will form on the surface, and you will essentially be painting on a layer of water, guaranteeing failure.
Incorrect Paint Application or Mixing
Always follow the Technical Data Sheet (TDS). For two-part products like epoxies and polyurethanes, the mix ratio is a precise chemical formula, not a suggestion [1, 12]. Incorrect mixing can lead to a coating that never fully cures. Similarly, using the wrong thinner or an excessive amount can weaken the paint film’s internal strength and reduce its adhesive properties [26].
Frequently Asked Questions (FAQs) About Marine Paint Adhesion Test Results
What is a good adhesion test result for marine paint?
This depends entirely on the test method and the paint system. For a pull-off test (ASTM D4541), requirements can range from 300 PSI for some topcoats to over 1,500 PSI for high-performance epoxy primers on a steel hull. For a cross-hatch test (ASTM D3359), a result of 5B or 4B is generally considered good and acceptable for marine applications. Always refer to the manufacturer’s Technical Data Sheet (TDS) for the pass/fail criteria.
How do you test marine paint for adhesion at home?
The most accessible DIY method is the knife test. Use a utility knife to cut an ‘X’ through the paint film to the substrate. Try to pry the coating up at the intersection with the knife point. If it’s very difficult to lift and only comes off in tiny, brittle chips, the adhesion is likely good. If it peels away from the ‘X’ in long strips or flakes, you have poor adhesion.
What causes poor paint adhesion on a boat?
The top four causes are: 1) Inadequate Surface Preparation (the #1 reason) [13, 19]; 2) Surface Contamination from salt, oil, or dust [8]; 3) Poor Environmental Conditions like high humidity or low temperature [1]; and 4) Incorrect Paint Application, such as improper mixing or thinning [1, 26].
Can you paint over old marine paint without adhesion issues?
Yes, but with critical caveats. You can only paint over existing paint if it is well-adhered, in sound condition, and compatible with the new coating. The old surface must be thoroughly cleaned to remove contaminants and then sanded to create a profile for the new paint to grip. For ensuring a strong bond between different types of coatings, using a dedicated tie-coat primer, like our JDH263 Epoxy Tie Coat, is highly recommended to prevent intercoat adhesion failure [14, 15].
Conclusion
Proper adhesion testing is not an expense; it’s an investment. By understanding the key test methods and how to interpret their results, you ensure a durable, protective, long-lasting finish.
![]()